Teuku.Net - Captcha verification is very useful to avoid spamming and robot users, usually this captcha feature is applied to contact or login forms to ensure that the user is not a robot.
Then the general file upload form is often used to confirm such as payments, sending images. In Joomla, captcha and file upload features for contact pages are already available in the Convert Forms plugin where users only need to configure in the plugin. But what about Blogger?
Captcha and Upload file features can also be applied to blogger contact form pages by integrating the contact form that we created into the formsubmit service. Now according to the title of this article, we will discuss how to create or apply Blogger Contact Form with additional reCaptcha and Upload Functions.
{getToc} $title={Table of Contents}
Setting up Google reCaptcha & File Upload in Contact Form Blogger
- Open Blogger Dashboard
- Select the Page Menu
- Click Create Page ➔ HTML Mode Display
- Copy the code below then paste it into the page
<!--Form Code Start Here--><div class="ContactFormWidget"><div class="form"><form action="https://formsubmit.co/Your_Email" method="POST" name="contact-form" onsubmit="return submitUserForm();" enctype='multipart/form-data' autocomplete="off"><input name="_template" type="hidden" value="box"/><input name="_subject" type="hidden" value="New submission!"/><input name="_captcha" type="hidden" value="false"/><input name="_next" type="hidden" value="https://www.teuku.net/p/thanks.html"/><div class='formColum'><div class="FormControl"><input id="ContactName" name="Name" placeholder='Name' type="text" value="" /><input id="ContactEmail" name="Email" placeholder='Email' type="email" value="" required/><input id="ContactPhone" name="Phone" placeholder='Phone' type="number" value="" /><input id="ContactAtt" name="attachment" placeholder='attachment' type="file" accept="image/png, image/jpeg" /></div><textarea id="ContactMessage" name="Message" placeholder='Message' rows="3"></textarea><div class="FormControlBtn"><!--reCaptcha Code Begin Here--><div id="g-recaptcha-error"></div><div class="g-recaptcha" data-callback="verifyCaptcha" data-sitekey="your_sitekey"></div><div id="g-recaptcha-error"></div><button class='button' id="ContactForm1_contact-form-submit" type="submit" value="Send Now">Send Message </button></div></div></form><!--Form Code End Here--><script src="https://www.google.com/recaptcha/api.js"></script><script>function submitUserForm() {var response = grecaptcha.getResponse();if (response.length == 0) {document.getElementById('g-recaptcha-error').innerHTML = '<span style="color:red;">Solve below reCAPTCHA.</span>';return false;}return true;}function verifyCaptcha() {document.getElementById('g-recaptcha-error').innerHTML = '';}</script><!--reCaptcha Code Ends Here--></div></div><style type="text/css">.FormControl{--gap:10px;--width:280px;display:grid;grid-template-columns:repeat(auto-fit,minmax(49%,0fr));grid-gap:10px}@media screen and (max-width: 820px){.FormControl{grid-template-columns:auto}}.formColum input[type=text], .formColum input[type=email], .formColum input[type=number], .formColum input[type=file]{height:auto;padding:14px;background:#fff;font-size:14px;border:1px solid rgba(0,0,0,0.08);outline:none;line-height:1.6em;transition:all .1s ease;border-radius:5px}.formColum textarea{width:99%;height:auto;margin:10px 0;padding:14px;background:#fff;font-size:14px;border:1px solid rgba(0,0,0,0.08);outline:none;line-height:1.6em;transition:all .1s ease;border-radius:5px}@media screen and (max-width: 820px){.formColum textarea{width:100%}}.formColum input[type=text]:hover, .formColum input[type=email]:focus, .formColum input:hover, .formColum textarea:hover{border:1px solid #333;background:#F9F9F9}.formColum input[type=text]:focus, .formColum input[type=email]:focus, .formColum input:focus, .formColum textarea:focus{border:1px solid #333;background:#F9F9F9}.formColum input[type=file]::file-selector-button{border:none;background:#0d45a5;padding:5px 10px;border-radius:5px;color:#fff;cursor:pointer;transition:background .2s ease-in-out}.formColum input[type=file]::file-selector-button:hover{background:#eee;color:#333}.button{display:flex;align-items:center;margin:10px 0;padding:15px;outline:0;border:0;border-radius:5px;line-height:1.3;color:#fffdfc;background:#ffc107;font-size:14px;max-width:320px;gap:5px;cursor:pointer}.ContactFormWidget .button svg{width:22px;height:22px;opacity:0.8;fill:#fff}.drK .formColum input[type=text], .drK .formColum input[type=email], .drK .formColum input[type=number], .drK .formColum input[type=file]{background:#1f2224;border-color:rgba(255,255,255,.15)}.drK .formColum input[type=text]:hover, .drK .formColum input[type=email]:focus, .drK .formColum input:hover, .drK .formColum textarea:hover{background:#1f2224;border-color:rgba(255,255,255,.15)}.drK .formColum input[type=text]:focus, .drK .formColum input[type=email]:focus, .drK .formColum input:focus, .drK .formColum textarea:focus{background:#1f2224;border-color:rgba(255,255,255,.15)}</style>{codeBox}
You can create a new page or use an existing contact page, if using the previous contact page first delete all the code of your contact page and replace it with the code above.{alertWarning}
Change all codes marked in yellow according to your blog data, for the steps follow the next step :
1. Configure the method="POST" attribute
- Go to https://formsubmit.co/email-link
- Enter your email address in the "Enter your email address" field (Use a special email to receive incoming contacts from your blog)
- Click Create Email Link then check for incoming emails
- Click the activation link to activate the email link
- If it is active, now edit the method="POST" attribute code that is marked
Find :
<!--Replace the marked code--><form action="https://formsubmit.co/Your_Email" method="POST" name="contact-form" onsubmit="return submitUserForm();" enctype="multipart/form-data">{codeBox}
Replace with :
<!--Be the email address you registered earlier on formsubmit.co-->
<form action="https://formsubmit.co/example@gmail.com" method="POST" name="contact-form" onsubmit="return submitUserForm();" enctype="multipart/form-data">{codeBox}
2. Adding reCaptcha Site Key Data
- Open the page https://www.google.com/recaptcha/admin/create
- Enter the Name in the "Label" column
- Select reCaptcha V2 Type in the next column
- Enter the Blog URL in the "Domain" column
- Check "Accept the reCAPTCHA Terms of Service"
- Click Submit
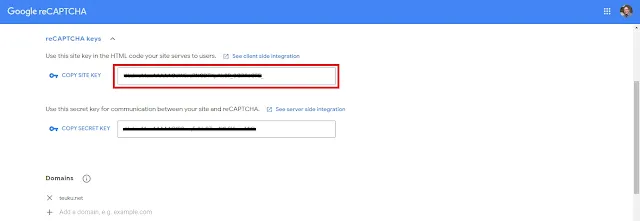
- Copy the Site Key reCaptcha that you have gotten
- Replace your sitekey in the previous contact code with the Site Key reCaptcha that you copied earlier.
<!--Change the Marked Code--><div class="g-recaptcha" data-callback="verifyCaptcha" data-sitekey="your sitekey"></div>{codeBox}
3. Verify Contact Form to be Active
If you have followed the two steps above, now the contact form can be used. But it needs a verification step first to be active.
The trick is to send a message via the contact page that you have created on the blog and then send it to your email address that registered earlier on fomrsubmit, there will be a verification link to the email to activate the form.
- Go to your Contact Page
- Send a message through the form
- Open the incoming email from formsubmit ➔ Click Activate Form
- Now the contact page is active
4. Additional Options
<input name="_subject" type="hidden" value="Teuku.Net Submission!" />{codeBox}
➔ Replace the URL of the marked page with the URL of your blog page, when the message has been sent visitors will be directed to the URL page.
<input name="_next" type="hidden" value="https://teuku.net/p/thanks.html" />{codeBox}
➔ Add the enctype="multipart/form-data" attribute to the form tag to enable file uploads
Find :
<form action="https://formsubmit.co/Your_Email" method="POST" name="contact-form" onsubmit="return submitUserForm(); ">{codeBox}
Replace with :
<form action="https://formsubmit.co/Your_Email" method="POST" name="contact-form" onsubmit="return submitUserForm();" enctype="multipart/form-data">{codeBox}
Reference from : formsubmit.co/documentation


